 |
Saturday, April 11, 2009
Inverter 100W 12VDC to 220V by IC 4047 - IRF540
This is inverter 100W circuit, use IC 4047 alike inverter 100W transistor I use Mosfet IRF540 instead Transistor 2N3055. It good Idae, power output 100W from transformer 2-3A. Read detail more in circuit. |
Circuit DC24V to AC220V Inverter 300W by NE555,CA3130,MJ15003
 This is circuit Inverter 300, Input battery 24V to Output 220V 50Hz 300W. Use Component IC 4027,NE555,CA3130,7805 and Transister MJ15003 |
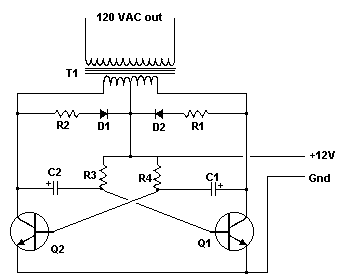
Circuit Inverter 100W by IC 4047 + 2N3055
| Circuit Inverter 100W by IC 4047 + 2N3055 This circuit Inverter input 12V (battery 12V) to out 220V 50HZ, Eesy circuit because less component to use. It use IC 4047 (oscillator 50HZ) and Power Transistor 2N3055 x 2 ,OUTPUT Power 100W.  |
12VDC Fluorescent Lamp Driver
A number of people have been unable to find the transformer needed for the Black Light project, so I looked around to see if I could find a fluorescent lamp driver that does not require any special components. I finally found one in Electronics Now. Here it is. It uses a normal 120 to 6V stepdown transformer in reverse to step 12V to about 350V to drive a lamp without the need to warm the filaments. Circuit diagram  Parts: C1 100uf 25V Electrolytic Capacitor C2,C3 0.01uf 25V Ceramic Disc Capacitor C4 0.01uf 1KV Ceramic Disc Capacitor R1 1K 1/4W Resistor R2 2.7K 1/4W Resistor Q1 IRF510 MOSFET U1 TLC555 Timer IC T1 6V 300mA Transformer LAMP 4W Fluorescent Lamp MISC Board, Wire, Heatsink For Q1 Notes: 1. Q1 must be installed on a heat sink. 2. A 240V to 10V transformer will work better then the one in the parts list. The problem is that they are hard to find. 3. This circuit can give a nasty (but not too dangerous) shock. Be careful around the output leads. |
CMOS INVERTER USING 4047
Using this circuit you can convert the 12V dc in to the 220V Ac. In this circuit 4047 is use to generate the square wave of 50hz and amplify the current and then amplify the voltage by using the step transformer. Circuit diagram  How to calculate transformer rating The basic formula is P=VI and between input output of the transformer we have Power input = Power output For example if we want a 220W output at 220V then we need 1A at the output. Then at the input we must have at least 18.3V at 12V because: 12V*18..3 = 220v*1 So you have to wind the step up transformer 12v to 220v but input winding must be capable to bear 20A. |
SIMPLE INVERTER CIRCUIT USING ASTABLE MULTIVIBRATOR
|
Tl494 AS USE TO SUBTITUTE FOR SG3524N
INVERTER: An inverter is an electronics device that converts battery DC to an AC signal it is the same thing as an oscillator. The AC signal can be of various waveforms; sinusoidal, rectangular, square, saw tooth, etc. The type of waveform that we use in our industrial and domestic homes is a sinusoidal wave; this is the best waveform that can run our appliance with out any problem of over heat.
Most model produce a modified square wave. This waveform allow home owners to run 98% of the typical loads in a house such as fluorescent lights, TVs, stereos, vacuums and power tools. The few limitations include some type of electronic controls like dimmer, switches, sensitive electronics like laser printers and photocopiers, and some small rechargeable devices. Occasionally some of these products will not work, or even fail, with modified square wave power. Some appliances like microwave may be noisier and stereo equipment and TVs may have a slight hum or buzz with this type of inverter power.
Inverters that produces pure sine wave to mimic convectional grid power eliminates background noise so that all appliance, including electronics, work without problem. They are particularly suited for sensitive electronics found in some computers and higher quality sound equipment.
INVERTER FOR HOMES… In large remote residences, particularly those using auxiliary generators, inverters can reduce the cost of power generator by up to 90%. Most inverters include a stand-by battery charger, so that when the generator is on, the batteries are automatically recharged. Once the generator is turned off, the inverter system powers the same AC circuits. Not only do you have quiet power available 24 hours a day, but in most cases the fuel savings alone can pay for the complete cost of the inverter system in less than a year!
WHY DO I NEED AN INVERTER? Inverter converts DC battery power to standard AC power. They allow you to run regular 120V, 220VAC appliances; including TVs, computers, microwaves and power tools. With an inverter your AC loads are run off your batteries and they can be used any time of day and night - without a generator – and definitely during a utility power failure.
When designing an inverter the power rating of the load is taken into consideration at maximum capacity. Choose a size that can power the appliance you plan to use. Typical sizes installed in our home systems are 1000W to 2500W. Larger inverters from 4KW to 11KW are used in large power systems and industrial applications. Inverters are rated according to the continuous power that they can produce; however, they are also designed to deliver large amounts of current for short period of time – a feature called surge capacity.
DESIGN OF AN INVERTER When designing an inverter, the first thing that comes to mind is an oscillator circuit. An oscillator is an electronic device that converts battery DC to an AC signal. The AC signal produce are non sinusoidal – they are AC signals that shows a great deviation from sine/cosine waveform; square wave, rectangular wave, saw tooth wave, trapezoid wave, quasi sine wave, etc (are all complex waves). However, sine wave can be generated by using special kind of oscillators such as Wien Bridge, Hartley oscillator, RC oscillator, and other Radio frequency oscillators. This kind of wave is not very easy to generate. The use of relaxation oscillators can produce square wave, quasi sine wave etc. Examples of these are the Multivibrators; Astable, Monostable, and the Bistable (flip- flop).
It is note worthy that it is the oscillator that produces the waveform signal for the inverter. So, the choice of oscillator matters. |
THYRISTOR INVERTER
THYRISTOR INVERTER
The principle and design of this kind of inverter is based on the class D commutation. The topology is also reliable and works on transformer less operation. This inverter circuit has the following advantages:
The circuit diagram is shown below
Auxiliary Impulse Commutated Inverter As shown above, the circuit consists of two main thyristors SCR1 and SCR2 two auxiliary thyristors SCR3 and SCR4, the feedback diodes D1 andD2 and the commutating circuit components L and C. The load R1 is connected between the pole point P and centre tap of DC supply. In order to explain the detailed circuit operation it is assumed that the circuit has attained the steady state while operation. It is also assumed that thyristor SCR1 is conducting and the current is flowing through the load from right to left, through upper half of the DC supply (V/2). The capacitor C is charged to its maximum voltage Vcmax with right hand side plate being positive, as shown. Now any time SCR1 has to be turned -- off, the anode is fired. The circuit consisting of C, L, T1 and T2 oscillates to reverse the charge across C. Thus, the net current through SCR1 is now the algebraic sum of the load current and the oscillatory cycle current. If the oscillatory cycle current is more than the load current, for a period of time higher than the turn off time toff of the device, the thyristor SCR1 will turn off the diode D1 in the mean time becomes forward biased. However, in case the charge across the plate of the capacitor is not fully reversed and SCR1 has recovered its blocking capability, the diode D1 will allow the oscillatory current to flow, helping C to reverse the charge. While the thyristor SCR1 is still conducting SCR2 is fired. The load current now transfers to SCR3 via SCR1, C and L, thereby helping the capacitor to develop its full charge in reversing direction (-Vcmax). As and when C is fully charged, the current through SCR1 dies down to zero. Thyristor SCR3 therefore turns off by itself. The load current now flows through SCR4 via the lower half of DC supply (V/2) from left to right. Thus, the direction of current through the load is reversed.
Any time when SCR2 is to be turned off, SCR4 is fired. The capacitor, which has been fully charged with –Vcmax across its plates, reverses through SCR3, SCR2 and L; thus pushing the oscillatory cycle current through SCR2 in the direction opposite to the load current. The commutation process repeats similar to that already described for commutation of SCR1. While SCR2 is still conducting fire SCR4 so as to make up the loss of charge across C (if any) during commutation of SCR2. As the end of this process when C is fully charged to Vcmax, the thyristor SCR2 turns off by itself, leaving SCR1 to continue conduction of current through the load from right to left. Thus, one complete cycle of operation is completed.
This inverter is very popular in all industrial applications and is therefore very widely used for variable speed drives.
MODIFIED SINGLE- PHASE Mc MURRAY INVERTER The auxiliary impulse commutated inverter (also popularly known as Mc Murray inverter) discussed in the preceding sub-section is one of the circuit techniques that is used to generate the pulse width Modulated (PWM) voltage. The basic circuit can be used as a building block in either single phase as half bridge (to generate a square waveform) or as full bridge (to generate a quasi square waveform). The main objective to use this circuit as a full bridge is to generate a quasi square or stepped load voltage wave, rather than square wave. The later is preferred in an attempt to reduce harmonics in the output waveform.
The full bridge consists of two identical inverters. While inverter 1 consists ofT1 and T2 as its main thyristors; inverter 2 has its main thyristors as T3 and T4. The two half bridges inverter 1 and inverter 2 are independently fired with a phase displacement between the two. The stepped load voltage waveform obtained at the output of bridge inverter is shown below. Since the load is connected between the two poles P1 and P2, the voltage across the load results into a stepped (quasi square) waveform with much lower harmonic content as compared to that of the square wave inverter.
|
Subscribe to:
Posts (Atom)
